Hold Your Team to the Highest Standard with SLAs
 Converge Team
When customers reach out, response time matters. SLA policies let you define exactly how fast your team should respond and resolve conversations—broken down by priority level. In this guide, you'll learn how to create policies, assign priorities, and let Converge track compliance automatically.
Who can manage SLAs? Creating, editing, and deleting SLA policies requires Admin / Owner Only permissions. All team members can view policies and see SLA status indicators on conversations.
How SLA Tracking Works
SLA tracking in Converge is fully automatic once you've created your policies. Here's the big picture before we get into the details:
You define the rules
Create SLA policies that set first-response and resolution time targets for each priority level (urgent, high, normal, low).
Converge tracks automatically
When a customer messages you, the SLA clock starts. Converge calculates deadlines, pauses the clock when you reply, and resumes it when the customer responds again.
Your team stays informed
Color-coded badges show time remaining at a glance. If a deadline is about to be missed, the assigned agent gets notified before it's too late.
Creating SLA Policies
Admin / Owner OnlyEach SLA policy is tied to a priority level and defines how quickly your team should respond and resolve conversations at that priority. You can have one active policy per priority.
Setting up your first policy
-
1
Open SLA Settings
Click the Settings icon in the sidebar, then select SLA from the settings menu.
-
2
Find the priority level and click "Add"
The settings page lists all four priority levels (Urgent, High, Normal, Low) in rows. Click the Add button next to the priority you want to create a policy for. If a policy already exists, you'll see an Edit button instead.
-
3
Name your policy and set time targets
A form expands inline. Enter a policy name, then define a first response target (how quickly an agent should send the first reply) and a resolution target (how quickly the conversation should be resolved). Both are measured in minutes.
-
4
Enable business hours (optional)
Toggle Use Business Hours to calculate deadlines using your company's working hours and timezone. When disabled, the clock runs 24/7.
-
5
Save and activate
Save the policy. Make sure the Active toggle is on. Inactive policies won't trigger any tracking.

Understanding the two time targets
First Response Time
How quickly your team should send the first reply after a customer reaches out. The clock starts when the inbound message arrives and stops when any agent sends a response.
Resolution Time
How quickly the entire conversation should be resolved. This clock intelligently pauses while waiting for the customer to reply and resumes when they respond.
Setting Customer Priorities
SLA policies are matched to conversations based on the customer's priority level. Every customer starts at "Normal" priority, and you can change it at any time to trigger different SLA targets.
The four priority levels
Urgent
Critical issues that need immediate attention. Use for outages, security incidents, or high-value customers with time-sensitive problems.
High
Important issues that should be addressed promptly. Use for VIP customers or complex problems that can't wait.
Normal
The default for all conversations. Standard support requests handled within your regular SLA targets.
Low
Non-urgent inquiries like feature requests or general feedback. Longer response windows keep your team focused on what matters.
Changing a customer's priority
-
1
Right-click the customer in the contact list
A context menu appears with a Priority submenu.
-
2
Select the new priority
Choose Urgent, High, Normal, or Low. The priority updates immediately and SLA tracking resets to use the new policy.

Filtering by priority
Need to see all urgent conversations at a glance? Click the filter icon in the contact list and use the Priority filter. Check one or more priority levels to narrow your view.
Understanding the Tracking Lifecycle
SLA tracking isn't just a static countdown. It adapts to the natural flow of a conversation—starting, pausing, resuming, and completing as your team and the customer interact.
Start
A new inbound message arrives for a customer whose priority matches an active SLA policy. Both the first-response and resolution clocks begin counting.
First Response
An agent sends the first reply. The first-response SLA is marked as "met" or "breached" depending on whether it was within the target time. The resolution clock continues.
Pause
After the agent replies, the resolution clock pauses. Your team shouldn't be penalized while waiting for the customer to respond.
Resume
The customer sends another message. The resolution clock resumes, continuing from where it left off.
Resolution
The conversation is marked as Resolved. The resolution SLA is marked as "met" or "breached" based on total active time (paused time is excluded).
Business hours mode: When enabled on a policy, deadlines skip non-working hours. If a customer messages at 6 PM and your team works 9 AM–5 PM, the clock doesn't start counting until the next business day.
Breach Notifications
Converge continuously monitors all active SLA tracking records. When a deadline is about to be missed, the right people get notified so they can act before it's too late.
How breach detection works
A background process checks every 2 minutes for SLA deadlines that have been exceeded. When a breach is detected:
Assigned conversations
The assigned agent receives an in-app notification alerting them to the breached SLA. They can click the notification to jump directly to the conversation.
Unassigned conversations
If no agent is assigned, all admins receive the breach notification. This ensures urgent conversations never fall through the cracks.
Each breach triggers exactly one notification—no repeated alerts for the same overdue item. The SLA status updates to "breached" and remains visible in all SLA indicators across the interface.
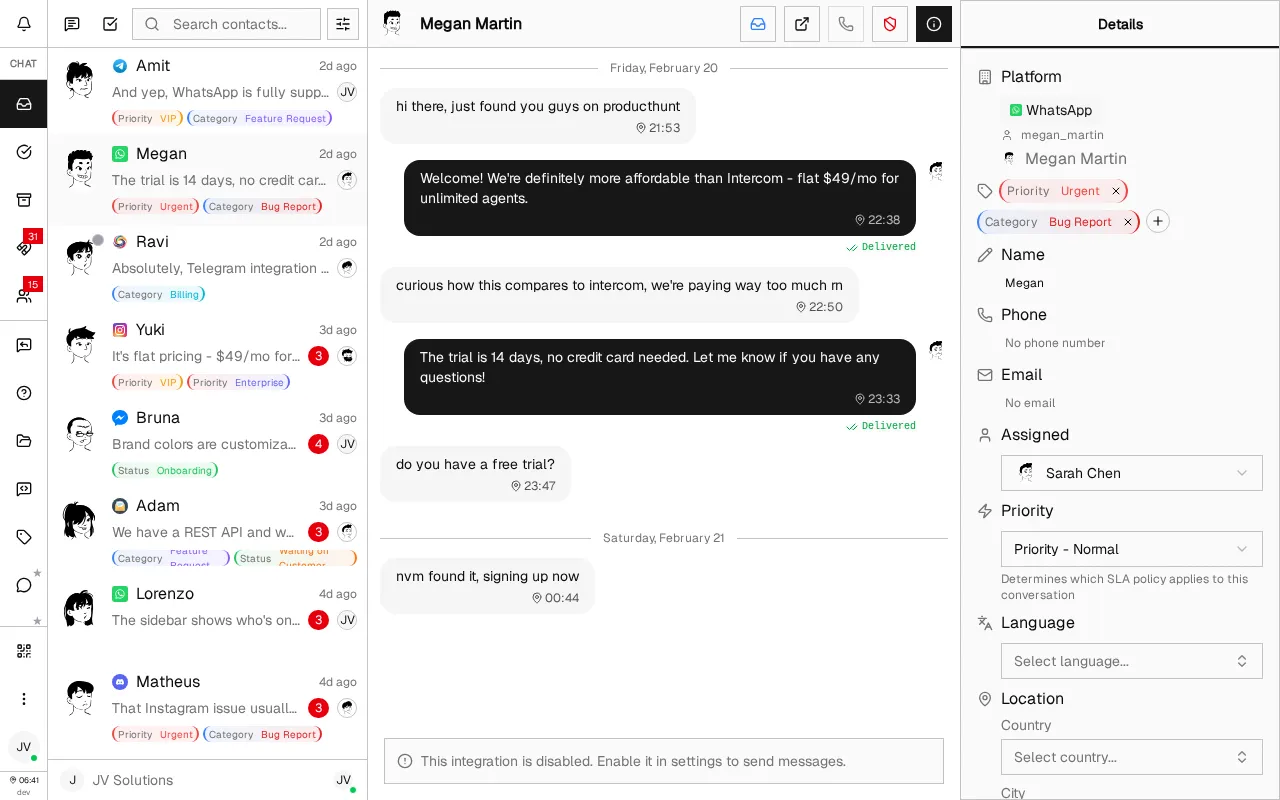
Reading SLA Status Indicators
SLA status is visible across the interface so you always know where things stand. Here's where to look and what the indicators mean.
Where SLA indicators appear
Contact List Badge
A compact color-coded badge next to the customer's name in the inbox. Shows the most critical SLA status at a glance—green for on track, yellow for approaching deadline, red for breached.
Chat Header
When you open a conversation, the SLA badge appears in the header with time remaining and a tooltip showing detailed information.
Customer Details Sidebar
The most detailed view. An SLA Status Card shows first response status, resolution status, deadlines, whether the clock is paused, and relevant timestamps.
Understanding the color codes
Green — On Track
Plenty of time remaining before the deadline.
Yellow — Approaching
Deadline is close. Act soon to avoid a breach.
Red — Breached
The deadline has passed. The SLA was not met.
Best Practices & Tips
Start with two policies
Create policies for Urgent and Normal priorities first. This covers most scenarios without overwhelming your team with too many tiers.
Enable business hours for fairness
Unless your team operates 24/7, turn on business hours mode. It ensures overnight messages don't count against your SLA targets.
Set realistic first-response targets
A 15-minute first response for Urgent and 60 minutes for Normal is a good starting point. Adjust based on your team's capacity and customer expectations.
Assign conversations promptly
Breach notifications go to the assigned agent. Unassigned conversations alert all admins, which can cause notification fatigue. Assign ownership early.
Use priority filters in the inbox
Filter by Urgent or High priority to focus on the conversations that matter most. This helps agents triage their queue efficiently.
Review SLA compliance regularly
Check your SLA stats weekly or monthly to spot trends. Consistently breached policies might mean your targets need adjusting—or that you need more agents.
Frequently Asked Questions
What happens if I don't create a policy for a priority level?
Can I have multiple policies for the same priority?
Does the SLA clock run outside business hours?
What happens when I change a customer's priority?
Why is the resolution clock paused?
Do I need to set both first response and resolution targets?
What's Next?
You've set up SLA tracking for your team. Here are some related features to explore:
- Inbox Guide — Master conversation management, filtering, and bulk actions
- Replies Guide — Speed up responses with quick replies and auto replies
- Analytics Guide — Track response times, SLA compliance, and team performance metrics
Need more help?
Our support team is here for you. Click the chat widget in the bottom right corner to start a conversation.
We typically respond within minutes during business hours.