Master Your Inbox
 Converge Team
Every message your business receives — WhatsApp, Telegram, Instagram, email, your website widget — lands in one list here. This guide covers navigating that list, filtering it, replying, and keeping it organized.
Understanding the Layout
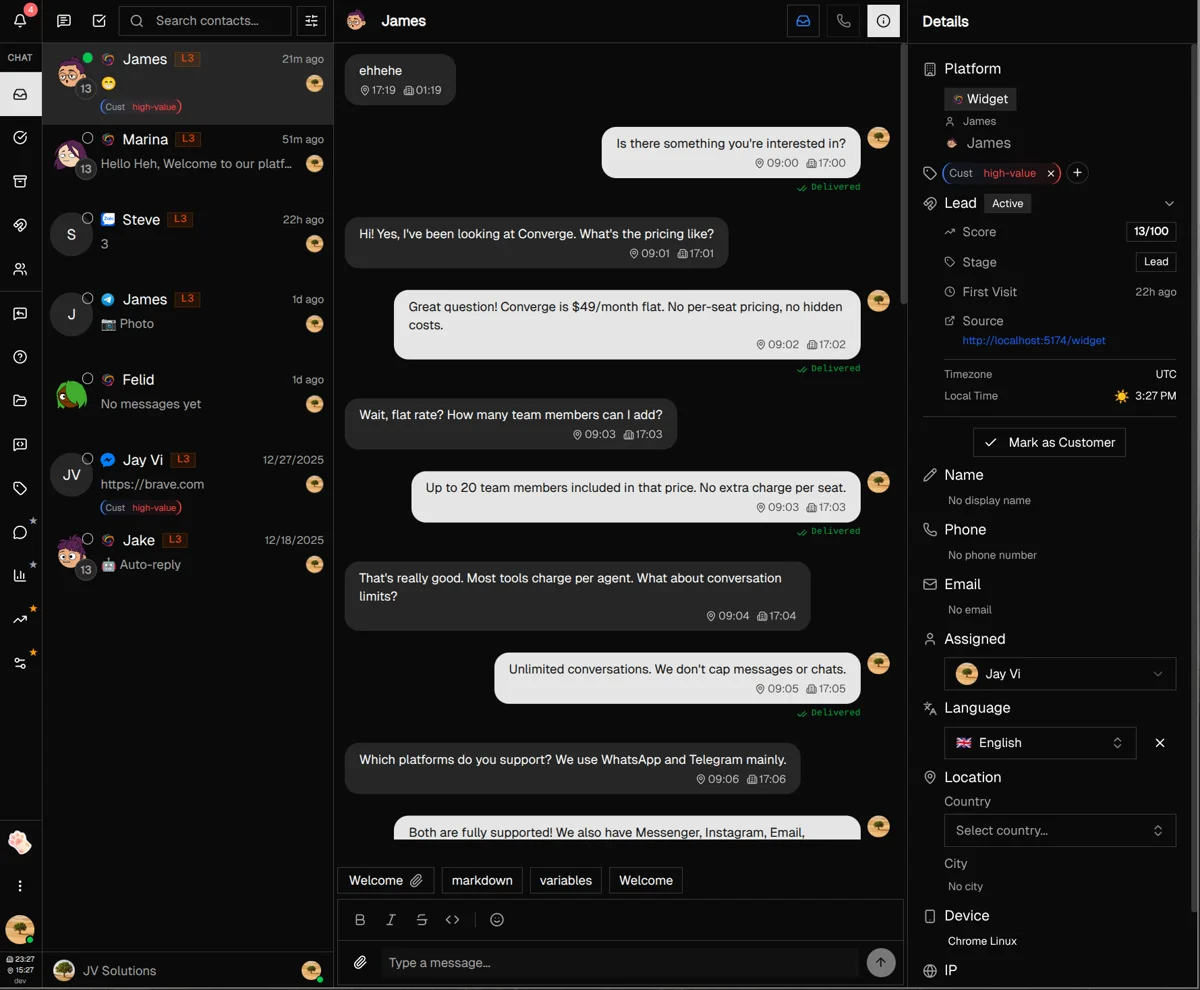
The Inbox uses a three-panel layout designed for efficiency. Once you understand where everything lives, navigating becomes second nature.
Contact List (Left)
All your active conversations appear here. You can search, filter, and select customers to view their messages. Unread counts and platform icons help you prioritize at a glance.
Conversation View (Center)
The main chat area where you read and respond to messages. Messages arrive live, typing indicators show both sides, media renders inline, and a small avatar row warns you when a teammate is viewing the same conversation.
Customer Details (Right)
A collapsible panel with two tabs. Details holds identity, tags, contact fields, the assigned agent, priority and notes. Activity holds the widget visitor's journey. Toggle the panel with the rightmost button in the conversation header.
Mobile View: On smaller screens, the panels become full-screen views that slide in and out. Use the back arrow to return to the contact list.
Navigating the Contact List
The contact list is your command center for finding and prioritizing conversations. With powerful search, filtering, and sorting options, you can quickly zero in on the customers who need attention.
Looking for messaging platform contacts? They're here. A contact created by an inbound WhatsApp, Telegram, Instagram or email message lands in the Inbox straight away, because a message already exists. The Leads tab holds the other case: tracked widget visitors nobody has written to yet.
Quick search
The search bar at the top filters the contacts already loaded in the list — by display name, full name, username, email, or phone — as you type. Press Enter or click the arrow button to search your entire contact history on the server instead of just the loaded rows.
To search message content, click the message search icon next to the search bar. That opens a full search panel: type at least two characters, then narrow the results by time range, platform, or agent.
Filtering contacts
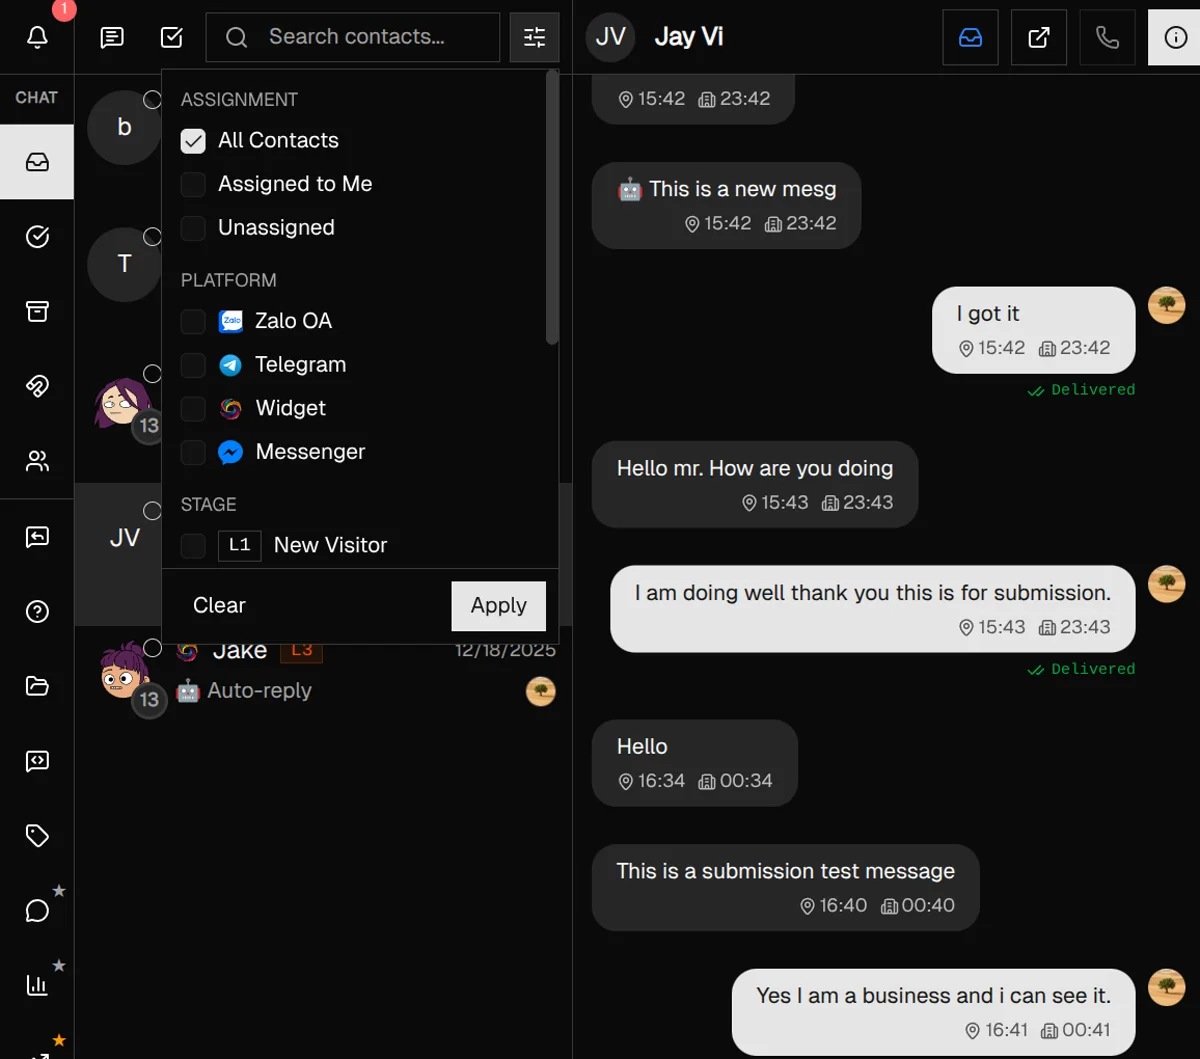
Click the sliders icon to open the filter panel. You can combine multiple criteria:
- Assignment — Show all contacts, only those assigned to you, or unassigned ones
- Platform — Filter by WhatsApp, Telegram, Instagram, Widget, or another connected channel. This section only appears once the list holds contacts from more than one platform
- Priority — Narrow to urgent, high, normal, or low priority conversations
- Tags — Filter by any tags you've applied to customers
Nothing changes in the list until you click Apply, and Clear resets every section at once. While filters are active, the sliders icon carries a badge with the number of filters in play.
Reading contact cards
Each contact card shows key information at a glance:
Visual indicators
- • Platform icon (WhatsApp, Telegram, etc.)
- • Online/offline dot (widget visitors only)
- • Lead score bar (contacts not yet marked as customers)
- • Unread message count
- • Mute and ban icons, when either applies
Quick info
- • Customer name and avatar
- • Last message preview
- • Assigned agent avatar
- • Applied tags
Managing Conversations
Converge organizes conversations into two status categories: Open and Resolved. Moving conversations through these statuses keeps your inbox clean and helps track your team's workload.
Open (Inbox)
Active conversations that need attention. New messages automatically appear here. This is your primary workspace.
Resolved
Issues that have been solved. Move conversations here when the customer's question is answered. They'll reopen if the customer messages again.
Changing conversation status
-
1
Open a conversation
Click any contact in the list to load their messages in the center panel.
-
2
Click the status button in the header
The button shows the current status — an inbox tray for Open, a checkmark for Resolved. Click it to open the status menu.
-
3
Select the new status
Choose Open or Resolved — the current status is greyed out. The conversation moves to the matching tab in the sidebar right away.
Two things ride along with this menu. Admins and owners get a Scan for knowledge item that asks the AI to pull reusable facts out of the conversation — see the AI Guide. And if CSAT surveys are switched on, resolving a conversation offers to send the customer a satisfaction survey, covered in the CSAT Guide.
Customer Details Panel
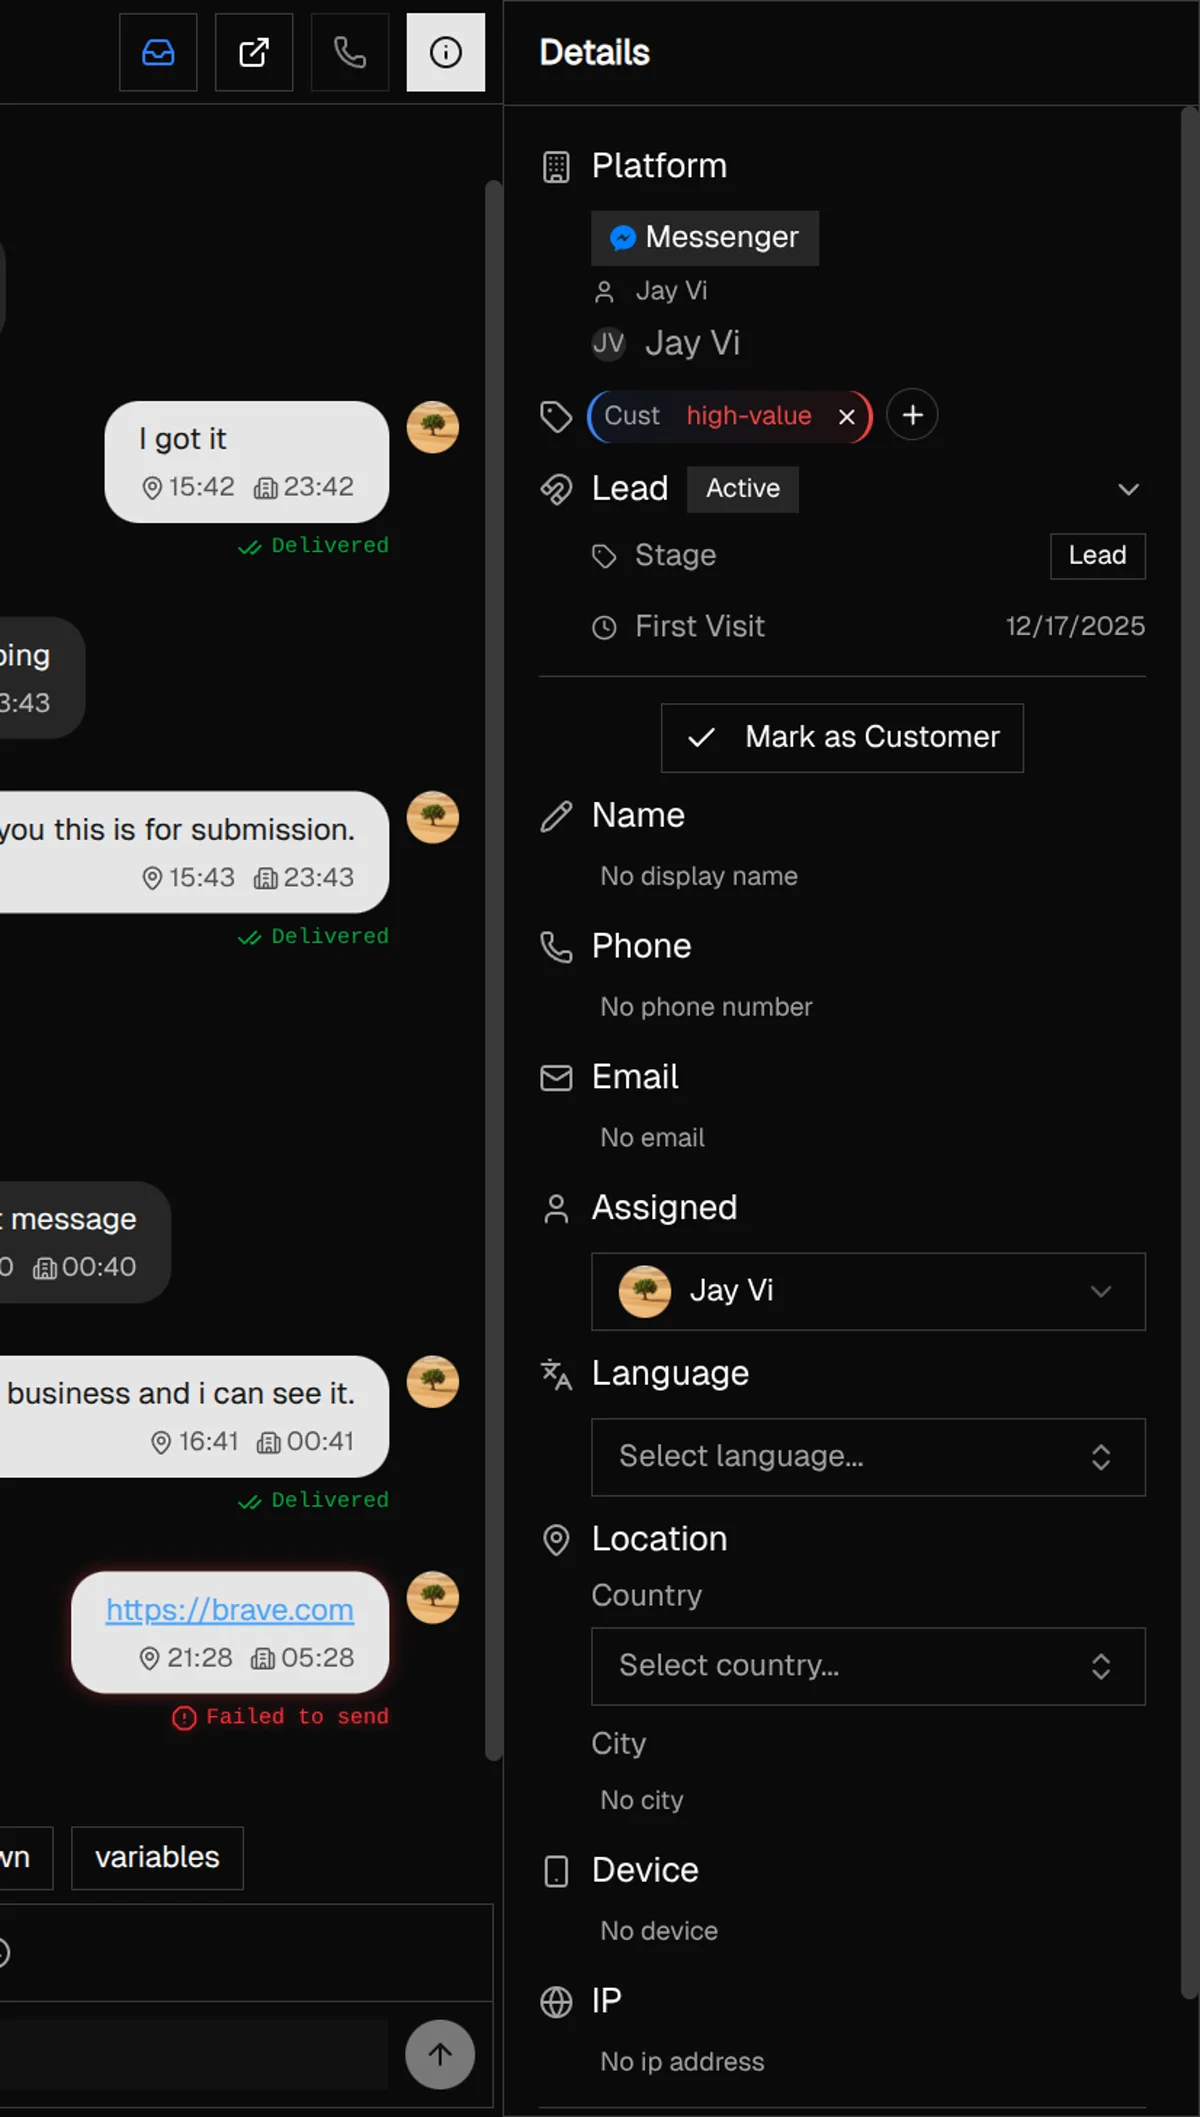
The right panel gives you a complete view of who you're talking to. Toggle it with the panel button at the far right of the conversation header. It has two tabs: Details and Activity.
The Details tab
Platform & Identity
See which platform they messaged from, their username, avatar, and full name. Edit the Name field to show a custom name across your workspace.
Contact Information
View and edit phone number, email, language, country, city, device, and IP address. Click any field to edit it inline. When an IP address is known, a company and network breakdown appears underneath it.
Tags
Add or remove tags to categorize customers. Tags appear on contact cards and can be used for filtering.
Priority & SLA
Set the conversation priority — urgent, high, normal, or low. If an SLA policy covers that priority, a card below it counts down the first-response and resolution deadlines and flags breaches.
Assignment
Assign the customer to a specific team member using the dropdown. The assigned agent's avatar appears on the contact card.
Notes
Add internal notes about the customer. Notes are visible only to your team, never to the customer.
Visitor Access
For widget visitors only: ban abusive or spam users to block them from sending messages. Banned visitors see a "blocked" message in the widget. Their conversation history and notes are preserved for your review.
The Activity tab
For widget visitors, the second tab holds everything the tracker recorded before and between conversations: lead score, first visit, source page, referrer and UTM campaign parameters, plus sessions, page views, total time on site, top pages, and a chronological timeline. At the foot of the lead card, Mark as Customer converts the lead — after that the lead score bar disappears from their contact card. The tab is hidden for contacts that have no visitor data, such as those created by an inbound WhatsApp message.
Sending Messages
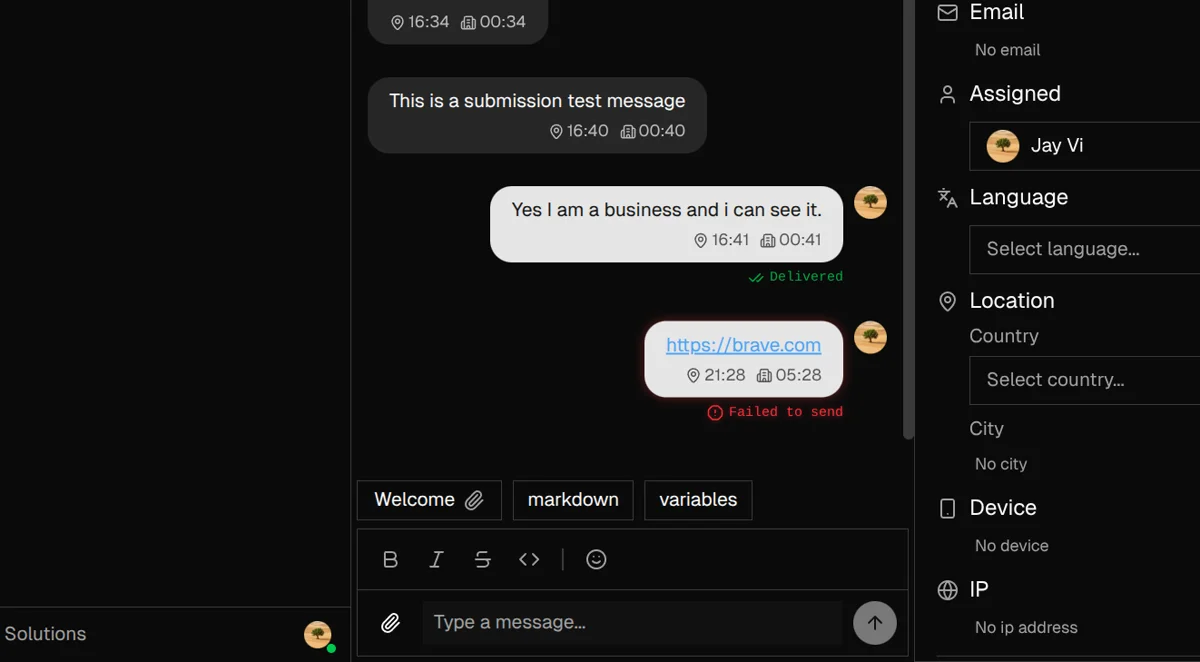
The message input area at the bottom of the conversation view is where you craft your responses. It supports formatting, attachments, quick replies, AI assistance, and on-demand translation.
Basic messaging
-
1
Type your message
Click in the text area and start typing. The box expands as you write longer messages.
-
2
Format if needed
The toolbar wraps your selection in bold (
Ctrl+B), italic (Ctrl+I), underline (Ctrl+U), strikethrough, or inline code. Underline is hidden on WhatsApp, which has no underline markup. Add emojis from the emoji picker. -
3
Send
Press
Enteror click the send button. UseShift+Enterfor a new line without sending.
Attachments
Click the paperclip icon to attach images, videos, or files. You can also paste images from your clipboard or drag and drop files directly into the message area.
Platform limitations: Some platforms have restrictions on file types or sizes. Converge automatically validates attachments against each platform's requirements.
Quick Replies
Above the message input sits one pill per Quick Reply group, each with the number of replies it holds. Click a pill to open that group and pick a reply — it drops straight into the composer. When the AI spots a saved reply that matches what the customer just asked, it highlights that group and opens it for you. Learn more in the Replies Guide.
AI assistance
The AI button in the toolbar reads the conversation and drafts a reply for you (Ctrl+Shift+S). With text already in the box it switches to Polish, rewriting what you wrote instead. Everything lands in the composer as an editable draft — nothing is sent for you. See the AI Guide.
Translation
When the customer's language differs from yours, a Translate button appears. Click it to translate the draft you've written; you'll see the translated text before it goes out, and the send button shows the target language's flag.
When you can't just type
A few channels put rules around outbound messages, and the composer adapts rather than failing on send. If a platform's service window has expired — WhatsApp's 24-hour rule, for example — the composer swaps to a template picker. If an integration has been disconnected, or the email thread came from a no-reply address, the box is disabled and tells you why. You can also start a fresh conversation from the empty chat screen with the compose button; that route is email only, needs a connected email integration, and isn't available during the trial.
Bulk Actions
Need to update multiple conversations at once? Bulk actions let you change status, delete, or export up to 10 contacts at a time.
Entering selection mode
-
1
Click the checkbox icon
In the contact list header, click the checkbox icon to enter selection mode.
-
2
Select contacts
Click contact cards or their checkboxes to select them. Select all takes the first 10 visible contacts, and ten is the hard cap — try to add an eleventh and Converge tells you so instead of selecting it.
-
3
Apply an action
Use the toolbar buttons to change status to Open/Resolved, delete contacts (Admin only), or export data.
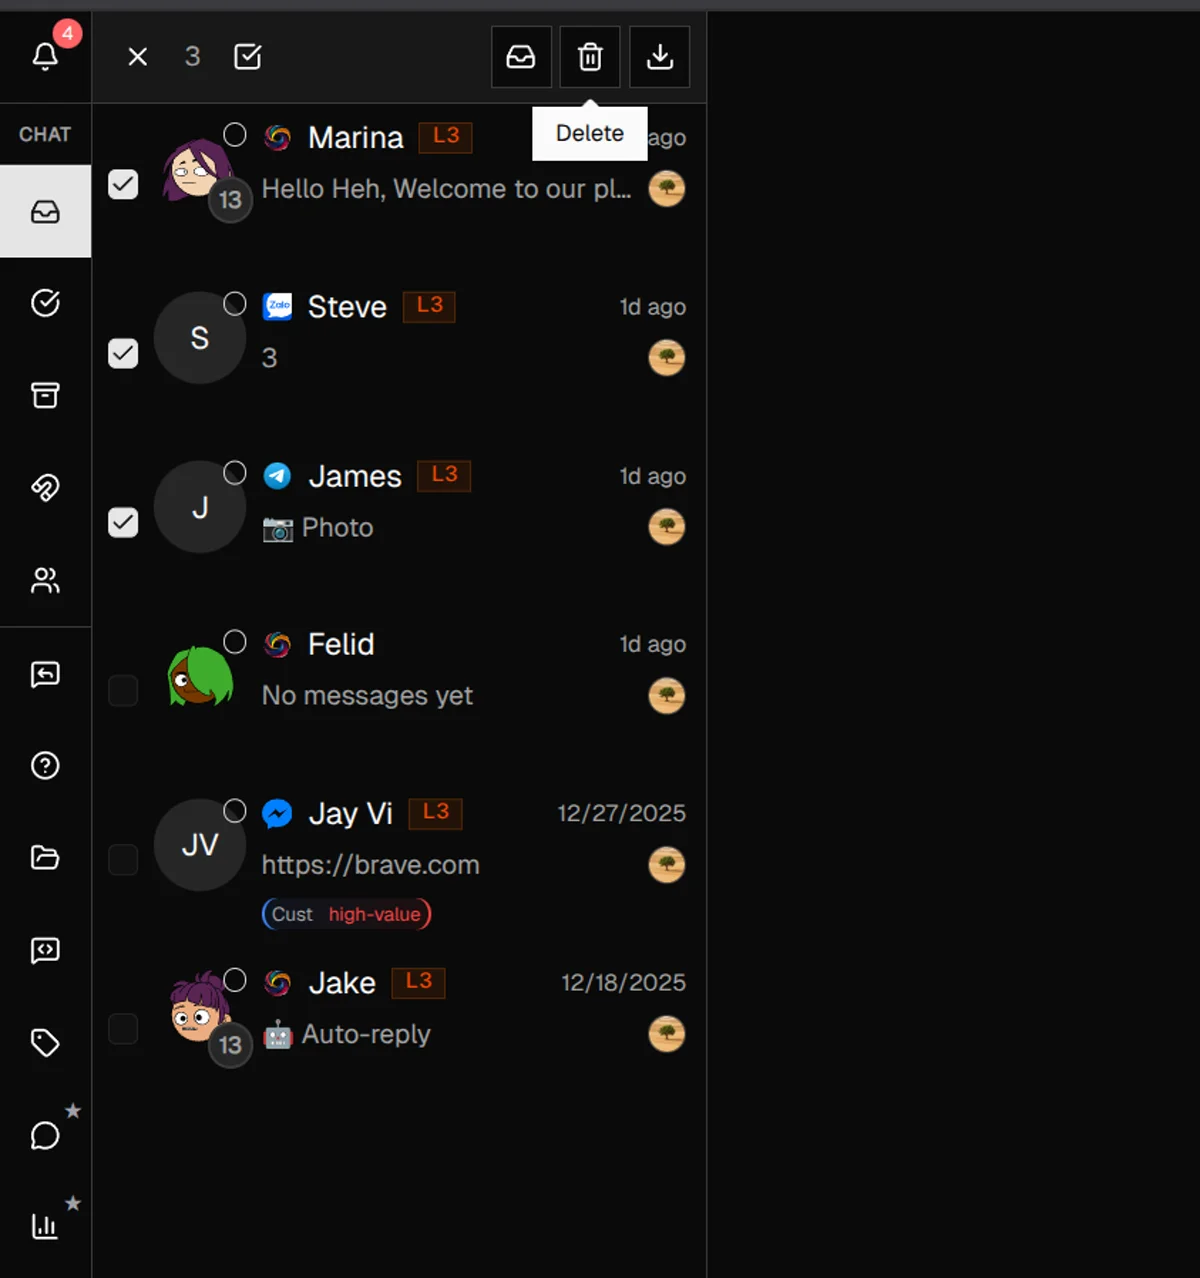
Admin Only: Deleting contacts and exporting data require Admin or Owner permissions. Regular team members can change statuses but not delete.
Best Practices & Tips
Resolve conversations proactively
After solving a customer's issue, mark the conversation as Resolved. This keeps your inbox focused on active issues and gives you accurate workload metrics.
Use tags to categorize
Create tags like "VIP", "Billing Issue", or "Feature Request". Filter by tags to find related conversations or prioritize high-value customers.
Assign ownership
Assign conversations to specific team members to avoid duplicate responses. Filter by "Assigned to me" to focus on your queue.
Add notes for context
Before handing off a conversation, add a note summarizing the issue and any actions taken. Future agents will thank you.
Mute non-urgent contacts
Right-click and mute contacts who send frequent but non-urgent messages. You'll still see their messages—just without notifications. If pushes aren't reaching you at all, follow the notification settings setup for Chrome, Firefox, Safari, and mobile PWAs.
Use keyboard shortcuts
Press Enter to send, Shift+Enter for new lines, Ctrl+B/I/U for formatting, and Ctrl+Shift+S for an AI draft. These small efficiencies add up over hundreds of messages.
What's Next?
You've mastered the Inbox basics. Here are some related features to explore:
- Replies Guide — Speed up responses with Quick Replies, Auto Replies, and Variables
- Tags — Organize contacts with custom tags and tag groups
- Platforms — Connect WhatsApp, Telegram, Instagram, and more
- Analytics — Track response times, resolution rates, and team performance
Need more help?
Our support team is here for you. Click the chat widget in the bottom right corner to start a conversation.
We typically respond within minutes during business hours.