Connect Your Messaging Platforms
Your customers are everywhere -- Telegram, WhatsApp, Instagram, Messenger, Zalo, Discord, email, X, and your website. Instead of juggling nine apps, connect all your channels to Converge and answer every conversation from one inbox. This guide walks through each connection step by step.
Supported Platforms
Converge integrates with the messaging platforms your customers already use. Each platform has its own connection process, but once connected, all messages flow into your unified inbox.

Telegram
Create a bot with BotFather and paste your token. Takes 2 minutes.
WhatsApp Business
Connect via Meta Business Suite with OAuth. Includes template management.

Connect your Business or Creator account via Facebook OAuth.

Messenger
Connect your Facebook Page to receive Messenger conversations.
Zalo OA
Connect your Official Account via OAuth. Includes ZBS template management.

Discord
Add a bot to your server and its direct messages land in your inbox.
Connect any mailbox over IMAP/SMTP with an app password -- Gmail, Zoho, Outlook, or custom.
X (Twitter)
Bring X direct messages in with four keys from your X developer app.

Website Widget
Embed a chat widget on your website with one line of code.
The Platforms page groups these into three buckets: Connected (live channels, each card showing the account it is attached to), Messaging platforms (everything you can connect today), and a collapsed Coming soon list.
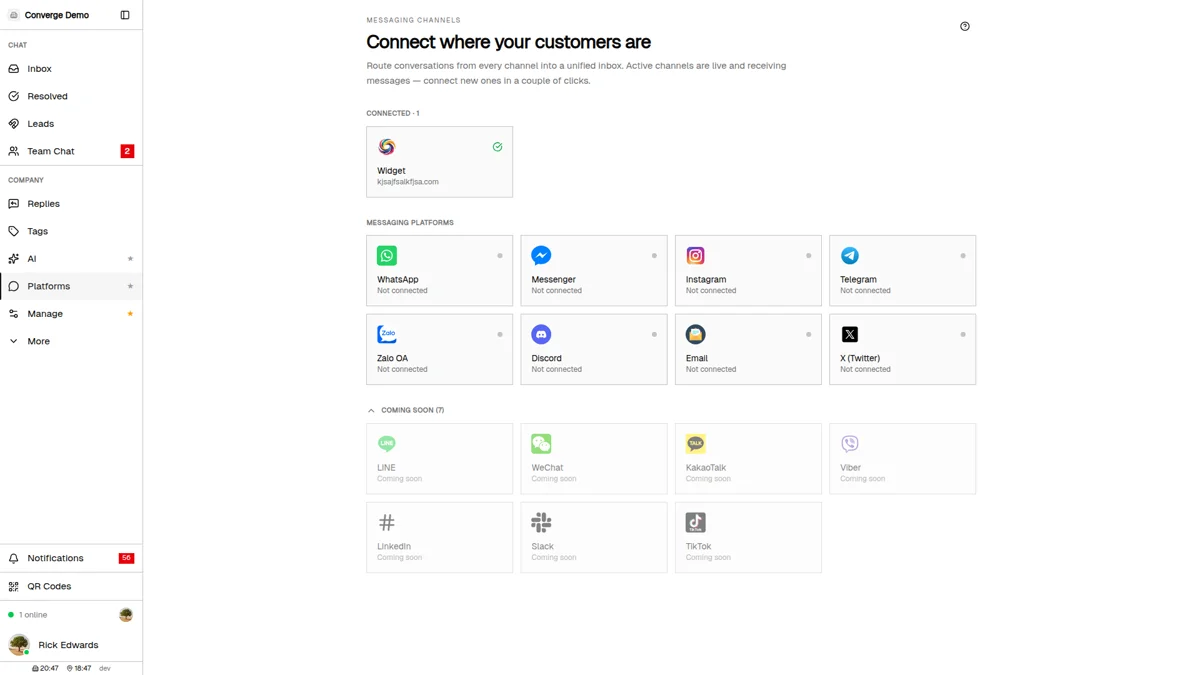
Coming soon: LINE, WeChat, KakaoTalk, Viber, LinkedIn, Slack, and TikTok appear greyed out and cannot be connected yet. If one of them is where your customers are, tell support -- we prioritize by demand.
Connecting Telegram
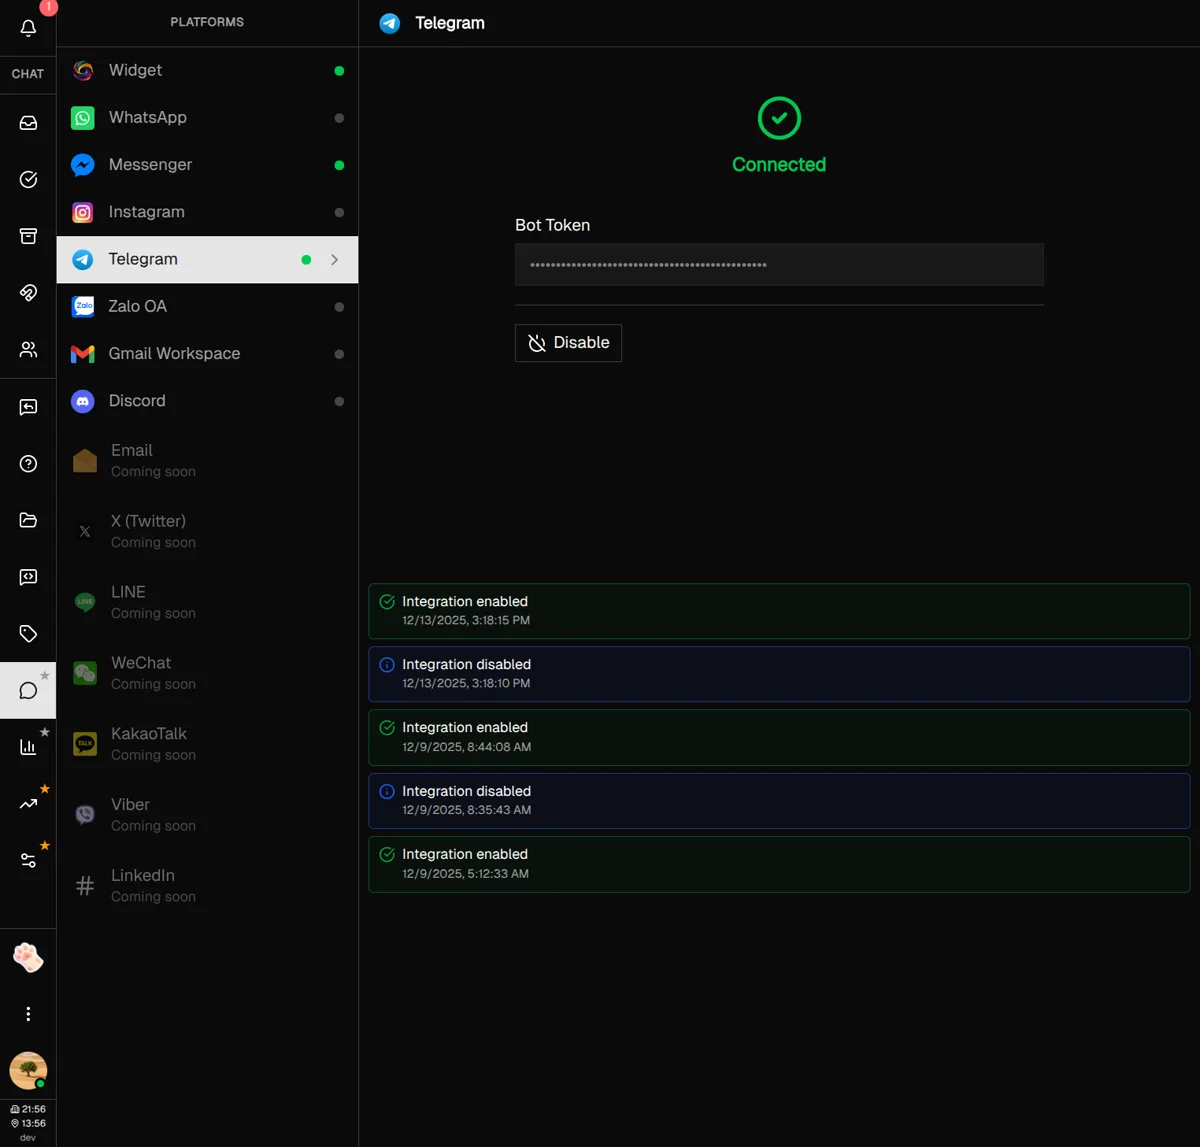
Telegram is one of the easiest platforms to connect. You'll create a bot using Telegram's BotFather, then paste the token into Converge. The whole process takes about 2 minutes.
Step 1: Create your Telegram bot
-
1
Open BotFather in Telegram
It's Telegram's official bot for creating other bots.
-
2
Send /newbot
BotFather asks for a display name and a username.
-
3
Choose a name and username
The username must end in "bot" (e.g., "AcmeSupportBot").
-
4
Copy the bot token
It looks like
123456789:ABCdefGHIjklMNO-pqrsTUVwxyz
Step 2: Connect in Converge
-
1
Open Platforms → Telegram
Click the Platforms icon in the sidebar, then Telegram.
-
2
Paste your bot token
Enter the BotFather token in the Bot Token field.
-
3
Click Enable
Converge verifies the token and starts receiving messages.
Connecting WhatsApp Business
WhatsApp Business uses Meta's official API, which means you connect through Meta Business Suite with OAuth. This ensures reliable delivery and access to advanced features like message templates.
Requirements
- WhatsApp Business account -- You need a business account, not a personal one
- Meta Business Suite access -- Admin access to your organization's Business Suite
- Verified phone number -- A phone number that can receive SMS or calls for verification
Connection process
-
1
Open Platforms → WhatsApp
Click "Connect WhatsApp Business" to open the Meta popup.
-
2
Log in to Meta Business Suite
Use the Facebook account with admin access to your business.
-
3
Select your WhatsApp Business account
Pick the business and phone number to connect.
-
4
Grant permissions
The page switches to the connected view on its own -- no reload needed.
If the popup never opens, an ad blocker is usually blocking Meta's SDK. Use the second button, Connect via Meta (Alternative): it opens Meta's own signup page in a new tab and Converge picks up the connection when you finish there. That flow waits up to 10 minutes before timing out.
Managing message templates
Meta requires pre-approved templates for any message sent outside the 24-hour customer service window. The WhatsApp page lists every template on your account with its category, language, and approval status -- APPROVED, PENDING, or REJECTED. Click a row to see its header, body, and footer.
New Template creates one without leaving Converge: a lowercase name (letters, numbers, and underscores), a category of Utility, Marketing, or Authentication, a language, body text, and optional header and footer. Meta reviews it before it can be used. The refresh icon pulls the latest approval statuses and is rate-limited to once every 30 seconds.
WhatsApp is reply-only in Converge: agents answer conversations the customer started, inside Meta's 24-hour window. Converge does not send template messages itself, so templates live here to be managed and kept approved for use in Meta's own tools.
Connecting Instagram & Messenger
Instagram Direct Messages and Facebook Messenger both connect through Meta, and the two flows are near-identical. They are still separate channels: Instagram and Messenger have their own cards on the Platforms page, their own OAuth popup, and their own Disconnect button. Connecting one does not connect the other.
Instagram requirements
- Instagram Business or Creator account -- Personal accounts cannot connect
- Connected to a Facebook Page -- Your Instagram account must be linked to a Page
- Admin access to the Facebook Page -- You need to be able to grant permissions
Messenger asks for less: a Facebook Page you administer, with Messenger turned on for that Page. No Instagram account is involved.
Connection steps
-
1
Open Platforms → Instagram (or Messenger)
Click Connect Instagram (or Connect Messenger) to open the Facebook popup. Allow popups for the site or nothing happens.
-
2
Log in to Facebook
Use the account with admin access to your Page.
-
3
Grant all requested permissions
These let Converge receive and answer messages for you.
-
4
Close the popup
Converge reloads the page once the window closes and shows the connected account.
Choosing which Page receives messages
If your Facebook account administers several Pages, the connected Messenger view adds an Active Page dropdown. One Page is active at a time, and switching takes effect immediately -- messages to the other Pages do not reach your inbox while they are inactive.
Connecting Zalo OA
Zalo Official Account (OA) connects via OAuth and includes support for ZBS (Zalo Business Service) message templates, similar to WhatsApp templates.
Requirements
- Zalo Official Account (OA) -- Create one at oa.zalo.me
- Admin access to the OA -- You need permissions to authorize third-party apps
Connection steps
-
1
Open Platforms → Zalo OA
Click "Connect Zalo Official Account" to open the Zalo popup.
-
2
Log in and authorize
Select your OA and grant the required permissions.
-
3
Close the popup
The page reloads once the connection completes.
Once connected, the page lists your ZBS templates read-only: name, tag (Transaction, Customer Care, or Promotion), approval status, parameters, and a preview link. Creating and editing them happens in the Zalo OA Dashboard; the refresh icon pulls the current list and is rate-limited to once every 30 seconds.
Connecting Discord
Discord integration uses a bot that joins your server and routes its direct messages to your Converge inbox. Posts in server channels stay in Discord -- only DMs to the bot arrive as conversations. The bot still has to be in your server, because Discord only lets someone DM a bot they share a server with. For the full walkthrough, including the Message Content intent that Discord requires before your bot can read message text, see how to connect Discord.
Setup steps
-
1
Create a Discord application
In the Discord Developer Portal, create an app and open its Bot section.
-
2
Copy the Application ID and Bot Token
The ID is on the main page; the token is under Bot.
-
3
Enter credentials in Converge
In Platforms → Discord, fill in Application ID, then Bot Token, and click Enable. Both are required.
-
4
Invite the bot to your server
Use the "Invite bot to your server" link, which appears as soon as the Application ID is filled in.
Connecting Email
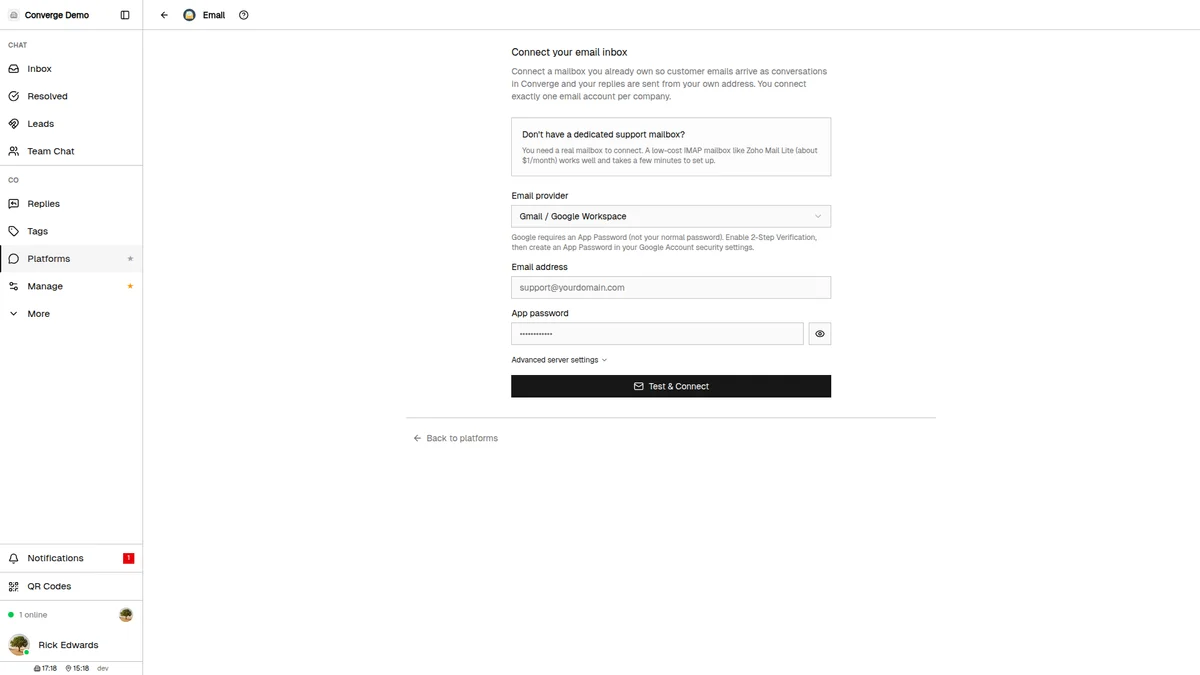
Connect your own mailbox -- like [email protected] -- over IMAP and SMTP using your own credentials. Converge reads incoming mail over IMAP and sends agent replies over SMTP, so your existing address keeps working while every message lands in your unified inbox. There are no DNS records to edit and no domain verification to wait on.
Paid plan required: Email is disabled during the 7-day free trial. Subscribe first, then connect your mailbox. One email account can be connected per company.
Setup steps
-
1
Pick your provider
In Platforms → Email, choose Gmail / Google Workspace, Zoho Mail, Outlook / Microsoft 365, or Other. Presets auto-fill the IMAP and SMTP servers; each shows an inline hint and a "Full setup guide" link.
-
2
Enter your email address
The mailbox you want to connect, e.g.,
[email protected]. -
3
Enter your password
Gmail and Outlook need an App Password (Google's app password guide, Microsoft's), not your normal login. Zoho uses an app-specific password when 2FA is on (see prerequisites). A custom host uses its mailbox or app password.
-
4
Add server details only for "Other"
Presets fill the hosts automatically; a custom host needs your IMAP and SMTP host and port.
-
5
Click Test & Connect
Converge verifies IMAP and SMTP and only enables the channel if both pass. A failure shows an inline error naming what went wrong.
Zoho Mail prerequisites
Zoho needs three things set up before it will connect, and skipping any one of them returns an authentication error:
-
1
Enable IMAP first
It's off by default. Enable it in Zoho Mail → Settings → Mail Accounts → your address → IMAP (Zoho: enable IMAP). EU and other datacenters use the same path -- Converge auto-detects the datacenter, so there's no host to type.
-
2
App-specific password if 2FA is on
A regular password won't work. Generate one in Zoho Accounts → Security → App Passwords and paste that (Zoho: app-specific password).
-
3
Paid plan required
IMAP needs Mail Lite or higher; the free tier has none.
What lands in your inbox
Converge checks the mailbox about once a minute. The first check starts from the moment you connect, so existing mail is never imported -- only messages that arrive afterwards become conversations. Quoted history and signatures are stripped, so an agent reads the new part of the thread rather than the whole chain.
Connecting X (Twitter)
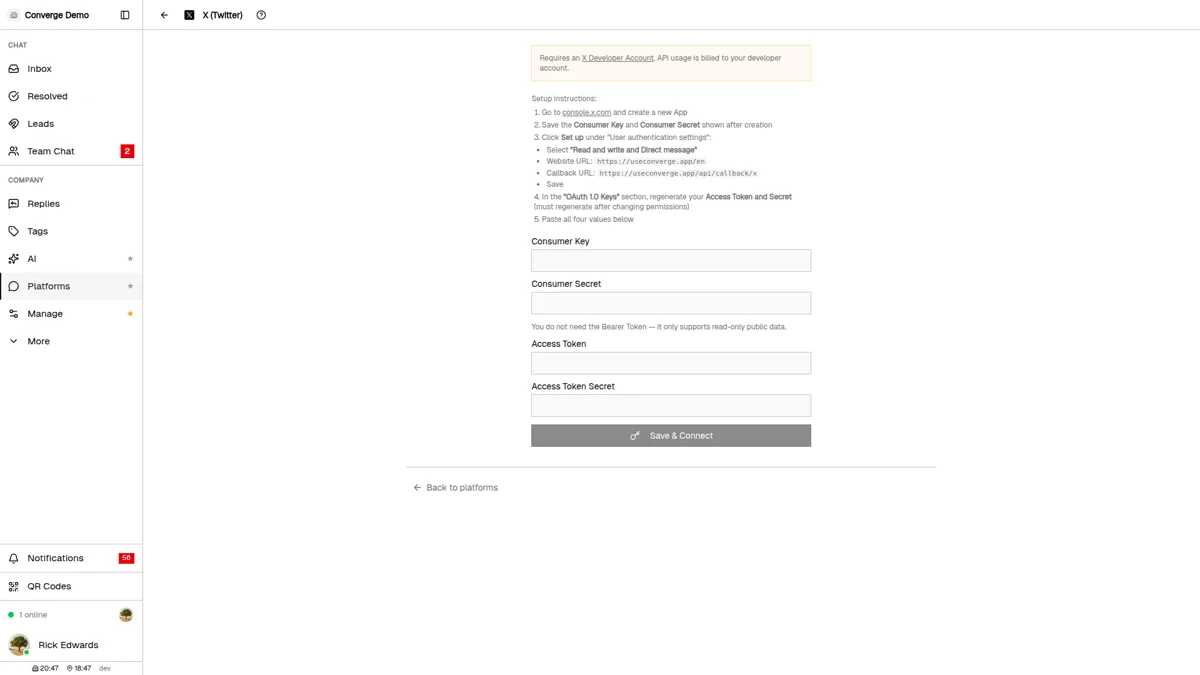
X direct messages arrive through your own X developer app rather than a Converge-owned one. That means an X Developer Account is required, and X bills the API usage to that account, not to Converge.
Setup steps
-
1
Create an App at console.x.com
Save the Consumer Key and Consumer Secret shown right after creation -- X does not display them again.
-
2
Set up user authentication
Under "User authentication settings", pick Read and write and Direct message, set the Website URL to
https://useconverge.app/enand the Callback URL tohttps://useconverge.app/api/callback/x, then save. -
3
Regenerate the access token pair
In "OAuth 1.0 Keys", regenerate the Access Token and Secret. A pair issued before the permission change carries the old read-only scope and will fail.
-
4
Paste all four values and click Save & Connect
Consumer Key, Consumer Secret, Access Token, Access Token Secret. The Bearer Token is not used -- it only reads public data.
Converge polls X for new direct messages about once a minute, so an X conversation can take a few seconds longer to appear than a Telegram or widget message. If X rejects the credentials with a permissions error, the channel switches itself off and shows the reason -- regenerate the token pair and connect again.
Installing the Website Widget
The Converge widget adds a chat bubble to your website, letting visitors start conversations without leaving your page. Installation requires adding one line of code.
Setup process
-
1
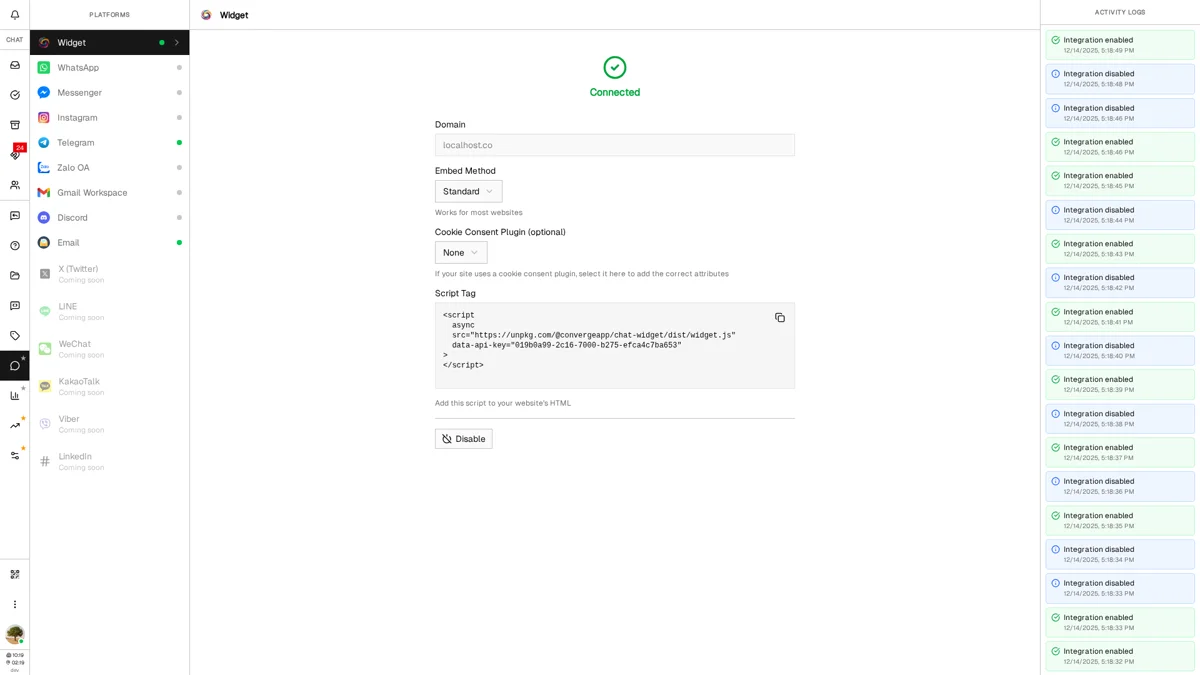
Go to Platforms and select Widget
Click on "Widget" in the platforms list.
-
2
Enter your website domain
Type your domain without https:// or paths. Example:
example.com -
3
Click Enable
Converge generates a unique API key for your widget and reveals the embed settings.
-
4
Pick an embed method
Standard works for most sites. Inline Loader is the fallback when a cookie consent plugin blocks the standard tag. The two Google Tag Manager options emit GTM-shaped snippets -- the simple one passes the key in the URL, the two-tag one needs tag sequencing so the config tag fires first.
-
5
Name your cookie consent plugin
Optional, and only offered for the Standard method. Choosing Cookiebot, CookieYes, CookieScript, or WPConsent adds that plugin's attributes so it classes the widget as necessary instead of blocking it.
-
6
Copy the script tag
The copy button puts the generated snippet, API key included, on your clipboard.
-
7
Add to your website
Paste the script tag into your website's HTML, preferably in the
<head>section.
Standard script tag:
<script async src="https://useconverge.app/widget.js" data-api-key="YOUR_API_KEY"></script>
The domain you entered is the security boundary. Converge accepts widget traffic from that exact hostname and any subdomain of it, and rejects everything else -- so example.com also covers shop.example.com, while a staging site on a different domain needs its own Converge account or a temporary domain change.
Best Practices
Start with one platform
Connect your busiest channel first. Get comfortable with the workflow before adding more platforms.
Test before going live
After connecting each platform, send yourself a test message to verify everything works correctly.
Fill the knowledge base before you connect
On a new account the AI first-responder answers first messages, and it answers from approved facts. A handful of entries under AI → Knowledge is worth more than a canned greeting.
Act when a channel switches itself off
If a platform rejects our credentials -- a revoked token, a changed permission -- Converge disables that channel and sends an in-app notification with the reason. Reconnect promptly; nothing queues up while it is off.
Keep credentials secure
Bot tokens and API keys should never be shared publicly. If a token is compromised, regenerate it immediately.
What's Next?
Your platforms are connected. Here are some features to explore next:
- Replies Guide -- Set up Quick Replies and Auto Replies for faster responses
- Widget Guide -- Customize your website widget's appearance and behavior
- Inbox Guide -- Learn how to manage conversations from all platforms in one view
- AI Guide -- Choose which of your new channels the AI answers on its own
Need more help?
Our support team is here for you. Click the chat widget in the bottom right corner to start a conversation.
We typically respond within minutes during business hours.