Respond Faster with Replies
 Converge Team
Your customers expect quick, personalized responses. Replies helps you deliver both—without typing the same message twice. In the next 10 minutes, you'll learn how to create templates, automate greetings, and personalize every message with dynamic variables.
Understanding Your Reply Toolkit
Before we dive in, let's quickly understand what you're working with. Replies combines three powerful tools that work together to make your team faster and more consistent:
Quick Replies
Pre-written message templates your team can insert with one click. Perfect for FAQs, policies, and common responses.
Auto Replies
Automated messages sent when customers first reach out. Great for instant acknowledgment and setting expectations.
Variables
Dynamic placeholders like {{customer.first_name}} that automatically fill in with real customer data.
Who can do what? All team members can create and use Quick Replies. Auto Replies and custom Variables require Admin or Owner access.
Creating Your First Quick Reply
Quick Replies are the foundation of efficient support. Instead of typing "Thanks for reaching out! Let me look into that for you..." a hundred times a day, you create it once and use it forever.
Building a template that works
-
1
Open Replies
Click the Replies icon in the sidebar (the speech bubble icon). You'll land on the Quick Replies tab.
-
2
Click "Add Quick Reply"
A dialog opens with a title field and a rich text editor.
-
3
Give it a clear title
This is what your team sees when selecting replies. Be specific: "Shipping Policy" is better than "Policy Info".
-
4
Write your message
Use the rich text editor to add bold, italic, or other formatting. Keep it conversational—this isn't a legal document.
-
5
Add a personal touch with variables
Click the Variables button and insert
{{customer.first_name}}at the start. Now every reply feels personal. -
6
Optionally attach a file
Need to include a PDF, image, or video? Click "Add Attachment" to select from your company assets.
Using Quick Replies in Conversations
Creating replies is only half the story. The real magic happens when you're in a conversation and can respond in seconds instead of minutes.
The quick replies bar
When you open any conversation, look above the message input field. You'll see a horizontal scrollable bar showing all your Quick Reply titles. This is your command center for fast responses.
Scroll through the bar or look for the title that matches what you need.
One click and the entire reply content appears in your message input, with any attachments ready to send.
Add a sentence, tweak the wording, or remove something that doesn't apply. The template is your starting point, not a straitjacket.
Hit Enter or click Send. Variables are automatically replaced with real customer data.
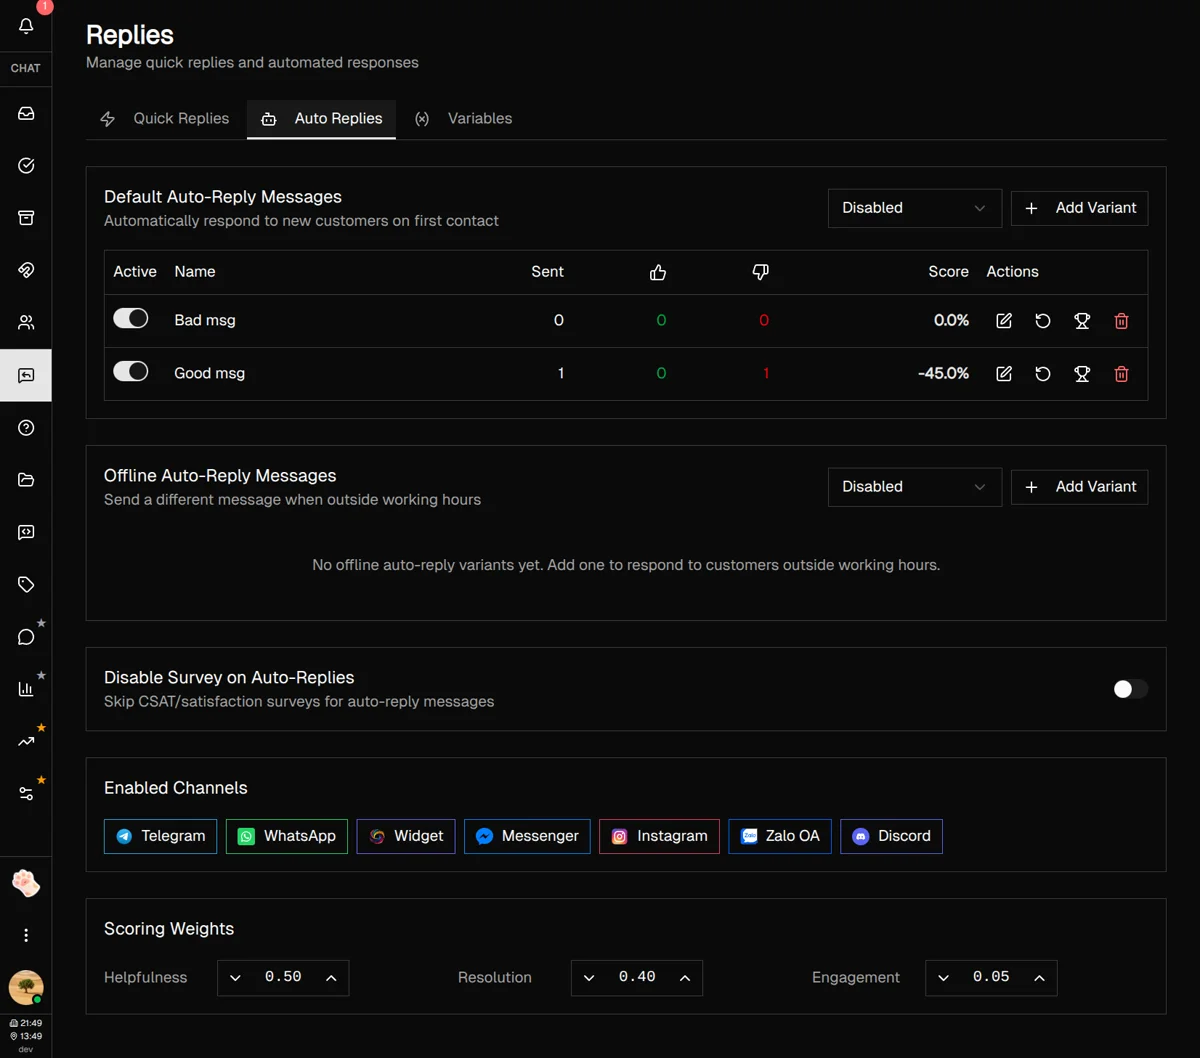
Setting Up Auto Replies
Admin / Owner OnlyWhen a customer messages you, they're wondering: "Did they get my message? How long until someone responds?" Auto Replies answer both questions instantly—before your team even sees the conversation.
Two types of auto replies
Default Replies
Sent when customers first reach out. Choose when to send:
- • Always — Every new conversation
- • Working hours only — During business hours
- • Disabled — Never send
Offline Replies
Sent outside your working hours. Options:
- • Offline hours — When team is away
- • Disabled — Never send
Creating your first auto reply
-
1
Go to the Auto Replies tab
Click the Replies icon in the sidebar, then select the "Auto Replies" tab.
-
2
Choose your mode
Use the dropdown to select when default replies should send (Always, Working Hours, or Disabled).
-
3
Add a variant
Click "Add Variant" and write your greeting message. Keep it warm and set expectations: "Hi! We typically respond within 10 minutes."
A/B testing your messages
Not sure which greeting works best? Create multiple variants and let the data decide. Each new customer randomly receives one variant, and you can track:
- Sent count — How many times each variant was used
- Thumbs up/down — Customer satisfaction feedback (widget only)
- Composite score — Overall effectiveness rating
When you find a winner, click the trophy icon to use that variant exclusively. You can always reset stats and start fresh.
Channel-specific control
Different platforms have different expectations. Toggle auto replies on or off for each channel independently—maybe you want them on WhatsApp but not on Telegram.
Mastering Variables
Variables are what transform generic templates into personalized conversations. Instead of "Dear Customer," you write "Hi Sarah." Instead of "our support email," you write the actual email. Here's everything you can use:
Built-in variables
| Variable | Output Example |
|---|---|
{{customer.first_name}} | Sarah |
{{customer.full_name}} | Sarah Chen |
{{customer.email}} | [email protected] |
{{customer.platform}} | |
{{employee.first_name}} | Alex |
{{company.name}} | Acme Inc |
{{company.current_time}} | 2:30 PM |
Creating custom variables Admin / Owner Only
Need to reference your support email, business hours, or return policy URL in multiple replies? Create a custom variable once, use it everywhere.
-
1
Go to the Variables tab
-
2
Click "Add Variable"
-
3
Set a key, label, and value
Key:
support_email→ Use as{{custom.support_email}}
Now when your support email changes, update it in one place and every reply using that variable updates automatically.
Best Practices & Tips
Name replies descriptively
"Return Policy - 30 Day Window" is findable. "Policy" is not. Your future self will thank you.
Always personalize the opening
Start every reply with {{customer.first_name}}. It takes one second and makes the message feel human.
Keep auto replies short
Auto replies acknowledge receipt and set expectations. Save the detailed help for when a human takes over.
Test at least 2-3 auto reply variants
You might be surprised which tone resonates. Casual vs. formal, short vs. detailed—let the data decide.
Use custom variables for anything that might change
Promotion dates, pricing, policy links—if it might change, make it a variable. Update once, update everywhere.
What's Next?
You've set up your reply toolkit. Here are some related features to explore:
- Tags — Organize customers to know which replies to use
- Assets — Upload files to attach to your quick replies
Need more help?
Our support team is here for you. Click the chat widget in the bottom right corner to start a conversation.
We typically respond within minutes during business hours.